Design Your Own Camper Van: A Step-by-Step Guide to Layouts, Costs, and Build Planning

To design your own camper van well, you need more than inspiration. You need a framework that accounts for space constraints, system complexity, and real-world costs before a single board is cut. Most people underestimate how interconnected every decision is. The bed placement affects the kitchen location. The kitchen affects the electrical load. The electrical load shapes your solar setup.
Getting these decisions right upfront is the difference between a functional build and a costly rework. This guide walks through every step from lifestyle planning to cost comparison. You will start with a clear plan rather than a rough idea.
A Glance at the Entire Process of Designing Your Own Camper Van
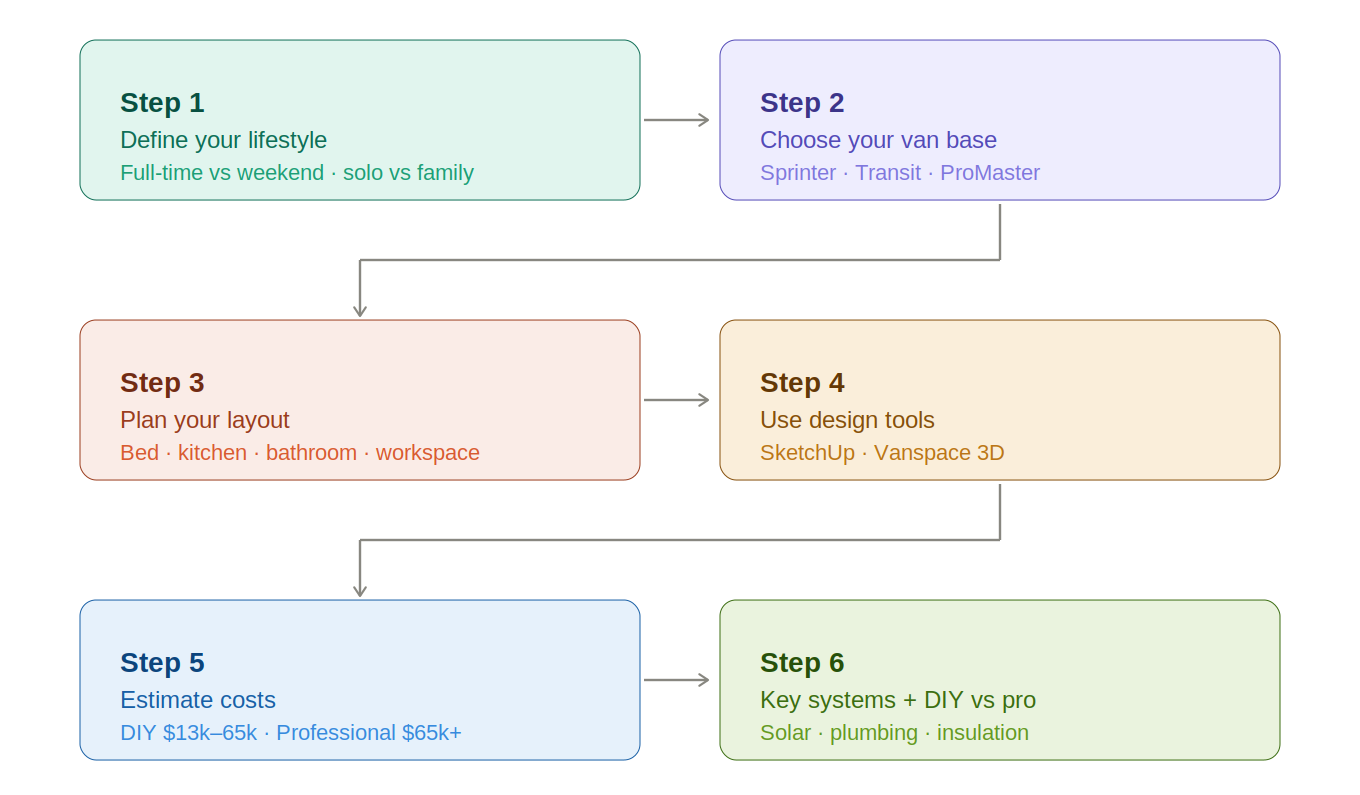
Step 1 - Define Your Camper Van Lifestyle
Before you design your own camper van, answer the questions that determine every layout decision downstream.
Full-time living demands different systems than weekend use. A couple needs different sleeping and workspace arrangements than a solo traveler. A digital nomad needs reliable power and a dedicated desk. These are not minor details. They shape the entire floor plan.
Key lifestyle questions to answer first.
Weekend use or full-time van life setup?
Solo, couple, or family?
Do you need a workspace for remote work?
Will you use the van in hot, cold, or varied climates?
How much outdoor gear needs to be stored inside?
Buying used versus new is part of this decision. A used van reduces upfront cost but may require more preparation before conversion work begins.
Step 2 - Choose the Right Van Base
The van you start with determines the ceiling for everything else. Interior height, floor length, wall profile, and payload all follow from the platform choice.
The three most common platforms for a DIY camper van build are the Mercedes-Benz Sprinter, Ford Transit, and RAM ProMaster.
| Van | Interior height | TWall profile | Service access | Best for |
|---|---|---|---|---|
| Mercedes Sprinter | Very high | Curved | Specialist | Premium or off-grid builds |
| Ford Transit | Tallest | Moderate | Nationwide | Versatile, budget-flexible builds |
| RAM ProMaster | High | Flat | Moderate | DIY builds, wide interior |
The ProMaster's flat walls simplify paneling and cabinetry. The Transit's dealer network reduces repair risk on the road. The Sprinter's height and 4x4 option suit serious off-grid builds.
The full chassis comparison breaks down how each platform affects build costs, labor hours, and long-term ownership.
Step 3 - Plan Your Camper Van Layout
Layout planning is the highest-leverage step in the process. A well-planned camper van floor plan eliminates conflicts between systems before construction begins.
Sleeping Setups
A fixed bed is the most comfortable option for full-time use. It runs lengthwise or crosswise depending on van width and user height. A convertible bed frees up daytime floor space but adds a nightly setup routine.
Kitchen and Storage
Slide-out galley kitchens save floor space when not in use. Under-bed drawers are the most efficient storage location in any van. Wall-mounted shelving and overhead cabinets recover vertical space that most first-time builders leave empty.
Bathroom and Workspace Options
A wet bath can fit in 24 to 30 inches of floor length in a high-roof extended van. Including a bathroom in the build affects the entire layout sequence and should be decided before any other fixtures are positioned. A workspace requires a stable surface, adequate lighting, and power access. All of these need to be planned into the electrical rough-in before walls go up.
Three Starter Layout Templates
Longitudinal fixed bed: bed runs nose-to-tail, kitchen on one wall, storage underneath. Best for solo travelers.
Crosswise fixed bed: bed runs side-to-side at the rear, kitchen forward. Best for couples in high-roof extended vans.
Convertible lounge: seating converts to a sleeping platform. Best for weekend use or smaller vans.
Step 4 - Use Tools to Design Your Van
Van design software lets you test layouts before committing to cuts and screws. SketchUp is free and widely used by both DIY builders and professionals. Vanspace 3D is purpose-built for van layouts, with a library of pre-modeled components and 100-plus predesigned floor plans.
These tools are useful for visualizing proportions. They do not account for real-world constraints like curved walls, wheel arch intrusions, or conflicts between electrical and insulation layers.
Professional builders sequence their work through a tested order of operations that software cannot replicate. Design tools are a starting point, not a substitute for build experience.
Step 5 - Estimate Costs
Van conversion cost varies significantly by build type, platform, and whether you are doing the work yourself.
| Build type | Van cost | Conversion cost | Total |
|---|---|---|---|
| Budget DIY | $10,000–$20,000 | $3,000–$10,000 | $13,000–$30,000 |
| Mid-range DIY | $20,000–$40,000 | $10,000–$25,000 | $30,000–$65,000 |
| Professional entry | $40,000–$60,000 | $25,000–$50,000 | $65,000–$110,000 |
| Professional premium | $60,000–$90,000 | $50,000–$100,000+ | $110,000–$190,000+ |
Hidden costs catch most first-time DIY builders off guard. Tools, rework from planning errors, and time away from income all add to the real cost. Experienced van builders note that a full-time live-in build realistically costs $10,000 or more in materials alone, excluding the vehicle.
A professional build costs more upfront but eliminates the risk of expensive errors in electrical, plumbing, and structural work.
Step 6 - Key Systems and DIY vs Professional
The systems that make a van livable are also the ones most likely to cause problems when done incorrectly.
Electrical and solar. Solar power for a camper van typically requires 200 to 400 watts of panels and a lithium battery bank. Undersized systems are the most common electrical mistake.
Plumbing. A van plumbing system ranges from a simple hand pump sink to a pressurized setup with a water heater. Every connection that leaks inside a wall causes mold and expensive repairs.
Van insulation and wiring. Insulation goes in before walls. Electrical rough-in goes in before insulation. Getting this sequence wrong means tearing out finished work. The correct build sequence prevents cascading errors and keeps the build on track.
DIY vs professional comparison.
| Factor | DIY | Professional |
|---|---|---|
| Upfront cost | Lower | Higher |
| Time required | High | Low |
| Risk of errors | High | Low |
| Customization | Medium | High |
| Build quality | Variable | Consistent |
| Resale value | Lower | Higher |
Professionals bring tested systems, correct sequencing, and warranty coverage. For buyers who want a van that works reliably from day one, the risk reduction justifies the premium.
Mistakes to Avoid and Final Thoughts
The most common mistakes in van conversion start at the planning stage, not the construction stage.
Poor layout planning. Deciding on features without mapping the floor plan leads to system conflicts.
Ignoring weight limits. Every van has a payload rating. Exceeding it affects handling and legal compliance.
Underestimating costs. Materials, tools, and rework add up faster than most first-time builders expect.
Bad ventilation. Cooking and humidity inside a sealed van require active ventilation.
DIY electrical errors. Incorrect wiring is a fire risk and expensive to diagnose after walls are closed.
Avoiding conversion mistakes is mostly a planning problem. Builders who get it right spend more time on decisions before they pick up a tool.
The best way to design your own camper van is to plan systematically. Be honest about your skill level before committing to a DIY build.
Mango Vans builds custom camper van conversions out of South Florida, designed around each client's specific lifestyle and travel goals. See the full range of Mango Vans builds before you decide between DIY and professional.
Frequently Asked Questions
How do I design my own camper van?
Start with your lifestyle requirements, choose a van platform, plan the floor plan, and map all systems before construction begins. Use design software to test layouts, but validate plans against the real van dimensions before cutting anything.
What is the best layout for a camper van?
A longitudinal fixed bed with under-bed storage and a wall-mounted kitchen is the most efficient layout for solo travelers. Couples typically need a crosswise bed in a high-roof extended van.
How much does it cost to build a camper van?
A budget DIY build on a used van starts around $13,000 to $30,000 total. A professional build on a new high-roof platform ranges from $65,000 to $190,000 or more depending on finish quality.
Is it cheaper to build or buy a camper van?
Building is cheaper upfront if you have the skills and tools. The hidden costs of rework, tools, and time often close the gap. A failed DIY attempt can cost more than a professional build.
What software can I use to design a camper van?
SketchUp is free and widely used. Vanspace 3D is purpose-built for camper van floor plans with a library of pre-modeled interiors and components.
How long does it take to build a camper van?
A first-time DIY builder typically takes three to six months part-time. A professional conversion takes four to twelve weeks depending on complexity.
Do I need professional help for a van conversion?
Not always. But electrical, plumbing, and structural work carry real safety and financial risks if done incorrectly. Buyers planning full-time or high-use builds benefit most from professional involvement.
What are the most important features in a camper van?
Reliable electrical systems, a comfortable sleeping setup, proper ventilation, adequate storage, and a functional kitchen determine daily livability.
Can I live full-time in a camper van?
Yes. A well-built van with reliable electrical, water, and sleeping systems supports full-time van life. Build quality and system sizing matter significantly more for full-time use than for weekend trips.
What mistakes should I avoid when designing a van?
Poor layout planning, underestimating costs, ignoring weight limits, skipping ventilation, and DIY electrical errors are the most common problems.